 GrindEQ Math Utilities
GrindEQ Math Ribbon
Close Microsoft Word and choose the GrindEQ Options from the Windows Start menu. And then enable (or disable) optional GrindEQ Math ribbon, which will be integrated into Microsoft Word.
Depending on Microsoft Word settings, GrindEQ Math will appear in the Microsoft Word Ribbon.
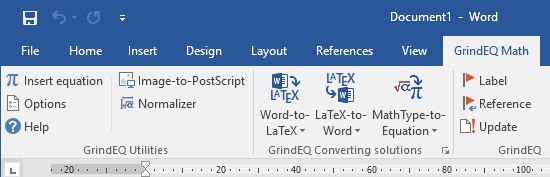
The GrindEQ Math ribbon contains macros. If your antivirus does not allow macros, use standard dialogs:
Save As ... LaTeX [GrindEQ]
Open ... LaTeX [GrindEQ]
Save As ... Microsoft Equation [GrindEQ]
Inserting Equations
You can choose the equation editor (Microsoft Equation, Equation Editor 3.x, or MathType) that will be launched by  Insert equation button. This feature might be useful if you have MathType installed on your machine, but need to use Microsoft Equations.
Image-to-PostScript
This freeware utility extracts Microsoft Word graphical objects (images, pictures, raster/vector graphics, diagrams, etc.) and creates PostScript files, which can be inserted into TeX/LaTeX document.
The converter processes graphical objects in Microsoft Word documents using a PostScript printer driver. You do not need to have a PostScript printer itself, just install any available PostScript printer driver and use it. Image-to-PostScript uses Adobe PostScript by default. To install another PostScript printer driver start Add printer wizard from Control panel | Printers panel. Choose Local printer in the installation wizard (leave all other options set to default). Then choose any PostScript printer (e.g. 'Apple LaserWriter'). After the installation is complete verify PostScript printer driver settings. Please note, most LaTeX compilers require Encapsulated PostScript (EPS) option to be turned on. You can find it in General | Printing Preferences... | Advanced... | PostScript Options | PostScript Output Option of Printer Properties.
Open Microsoft Word document and select a graphical object you want to extract. Image-to-PostScript can process only one object at a time. You can select a part of your document with the assumption that the selection contains a single graphical object. And then click  Image-to-PostScript button.
Image-to-PostScript will ask you to choose a PostScript printer driver (Adobe PostScript by default). The converter will give you a short report with a corresponding LaTeX instruction and a full name of the created PostScript file.
The converter creates PostScript files with the following file name mask: '<yourdocument>_image<n>.eps', where <yourdocument> is the name of your current Microsoft Word document, <n> is a valid number (1-1000) with the assumption that the created PostScript file will not replace any existing file.
Cross-References
Cross-referencing is an essential aspect of professionally prepared documents. References can be maintained manually (as most of the Microsoft Word users are used to do), but with the document size growth the procedure of maintaining references becomes a quite time-consuming task. And it would be a nice idea to automate such a tedious routine. The freeware GrindEQ Cross-references utilities provide incredibly easy tools to do this.
Labels and References
At first, you need to label the existing equation instead of typing an equation number manually. Move the cursor to the place you want a equation number (a label) to appear and click  Label button. Then choose the necessary format and type a new name of the label. The name of the label does not appear in the text, but is used for references. Only Latin characters and digits are allowed in the label name, the first symbol must be a character, the maximum length of the name is 20 symbols (e.g. 'eq1'). Click Insert button and the current equation number will appear in the text. You can add new numbered equations at any place in your document. The numbering will be updated automatically! Click
  Update button to force Microsoft Word to recalculate the equation numbers. Double-clicking on the label updates the appropriate equation number.
After you have labeled an equation (suppose the label name is 'eq1'), you can refer to it from any place of your document. Move the cursor to the place you want the number of the referred equation (a reference) to appear and click  Reference button. Then choose the name of the label you want to refer to (in our case 'eq1'). Click Insert button and the appropriate equation number will appear in the text. Double-clicking on the reference moves the cursor to the referred label.
Section/Heading Number and Labels
You can include a section/heading number in the equation number. At first, you need to label the existing numbered heading. To convert a paragraph to the numbered heading move the cursor to the paragraph you want to convert and select one of the Heading 1 ... Heading 9 formats accessed via Format | Styles and Formatting... from Microsoft Word menu. Then select Format | Bullets and Numbering... | Numbered tab | 1._ 2._ 3._ style from Microsoft Word menu to make it numbered.
Move the cursor to the numbered section and click Label button. Then type a new name of the label. The name of the label does not appear in the text, but is used for references. While labeling an equation, check Include section number option and select the appropriate section label from Section list.
Converting Cross-References
You can convert existing manual cross-references to GrindEQ automatic cross-references. Label the equation as described above and delete the old equation number. Convert all instances of the old equation number into automatic cross-references to the newly created label with Manual-to-GrindEQ utility accessed via GrindEQ Math | Cross-References | Manual-to-GrindEQ from Microsoft Word menu.
You can also convert existing GrindEQ automatic cross-references to manual cross-references with GrindEQ-to-Manual utility accessed via GrindEQ Math | Cross-References | GrindEQ-to-Manual from Microsoft Word menu.
Other Tools
The Normalizer utility normalizes Equation Editor 3.x objects to the same appearance (e.g. the same font, style, and size). Select an equation or a part of your document, and then click  Normalizer button.
You can quickly reopen the current document with  Reopen document button and print the current page with
  Print page button.
 Word-to-LaTeX
LaTeX-to-Word
MathType-to-Equation
Options
Options are accessed via GrindEQ Math | Options from Microsoft Word menu, or choose GrindEQ Options from the Windows Start menu.
Here you can select the preferable language and skin. See more...
Default Equation editor – you can choose the equation editor (Microsoft Equation, Equation Editor 3.x, or MathType) that will be launched by Insert Equation button. This feature might be useful if you have MathType installed on your machine, but need to use Microsoft Equations.
If you have MathType installed on your machine, but need to use Equation Editor 3.x, you should turn off the Convert to MathType option in MathType's Equation Conversion Manager. To run the Equation Conversion Manager, choose it from the MathType sub-menu of the Windows Start menu. A dialog will be displayed with two lists of equation types. Use the Move» button to move Microsoft Equation type from the left list (Convert to MathType) to the right list (Do not convert).
If you want MathType to open Equation Editor 3.x objects for editing, turn the Convert to MathType option on.
Equation Editor 3.x appearance is controlled with MathType style option. When this option is checked, Equation Editor 3.x starts in its own window (like MathType), otherwise Equation Editor 3.x toolbar and editing box appear. Checking this option gives you some benefits. You can select different view zoom, edit several equations simultaneously, and eventually (as practice shows) gain some overall performance boost. Option changes take effect after Microsoft Word restart.